In this article I would like to present you 10 highlights from the MBS Xojo Plugins innovations of 2022.
MongoDB
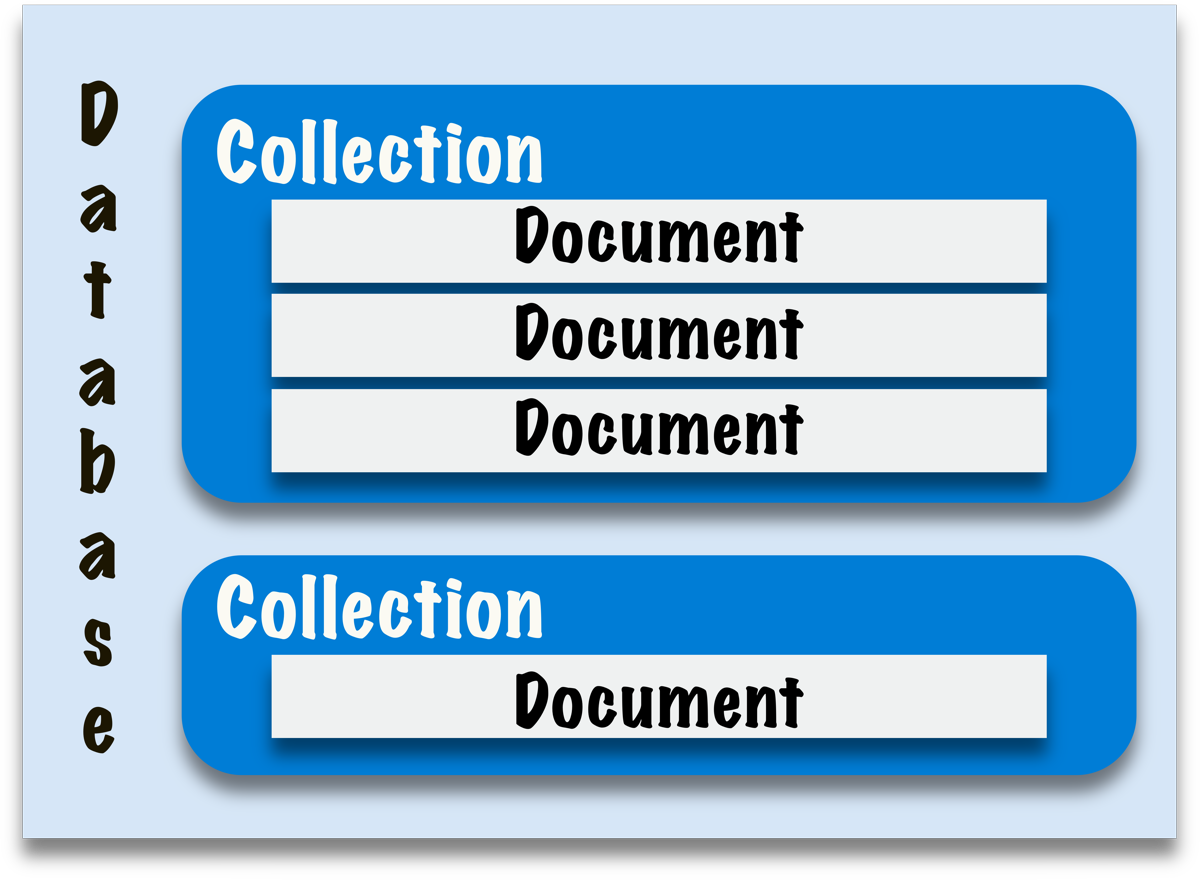
The MongoDB section joined the family of plugins in release 22.3 and has been developed further since then. You can use Xojo to access MongoDB databases, read, write and delete data. The special thing about Mongo DB is that it is not a rational database that is limited by relationships and tables, but is based on a JSON-like structure that also allows unusual queries. For example, you can formulate searches to see who has been in your company longer, the carpet in the warehouse or your employee. In rational databases, your carpet wouldn't normally appear in the same table as your employee. So you would have to design a separate table to be able to make this query. In Mongo DB, the records, here called documents, can coexist in the same collection and a simple query can be made.
In Release 22.5, another important innovation was added for this area. You can now also execute transactions on MongoDB. Normally, every change in the database is immediately applied as soon as it has been made. But this is not always desirable, e.g. when it comes to security relevant things where multiple records have to be changed. If in the middle the connection breaks we don't know in which state our database is, which records have been changed, which not. For this there are the transactions, with which we can tell the database to make all changes at once or to reject all changes made. If you would like to try Mongo DB, please check out our examples.
In this article I would like to present you 10 highlights from the MBS FileMaker Plugin innovations of 2022.
One Plugin for FileMaker AND Claris
Recently, the first version of the Claris product line has been released. We are proud to announce that our plugin also work on the new platform and you can use it there as usual.
The best thing is that you can use the same plugin file for FileMaker and the new Claris. This is the first and currently the only plugin worldwide that works on both platforms equally.
MongoDB
The MongoDB section joined the plugin in release 12.3 and has been developed ever since.
You can use FileMaker to access MongoDB databases, read, write and delete data. The special thing about Mongo DB is that it is not a rational database that is limited by relationships and tables, but is based on a JSON-like structure that also allows unusual queries. For example, you can formulate searches to see who has been in your company longer, the carpet in the warehouse or your employee. In rational databases, your carpet wouldn't normally appear in the same table as your employee. So you would have to design a separate table to be able to make this query. In Mongo DB, the records, here called documents, can coexist in the same collection and a simple query can be made.
In Release 12.5, another significant innovation was added for this area. You can execute transactions on MongoDB since then. Normally, every change in the database is immediately applied as soon as it has been made. But this is not always desirable, e.g. when it comes to security relevant things where multiple records have to be changed. If in the meantime the connection breaks we don't know in which state our database is, which records have been changed, which not. For this there are the transactions, with which we can tell the database to make all changes at once or reject all made changes. If you would like to try Mongo DB, please check out our examples.
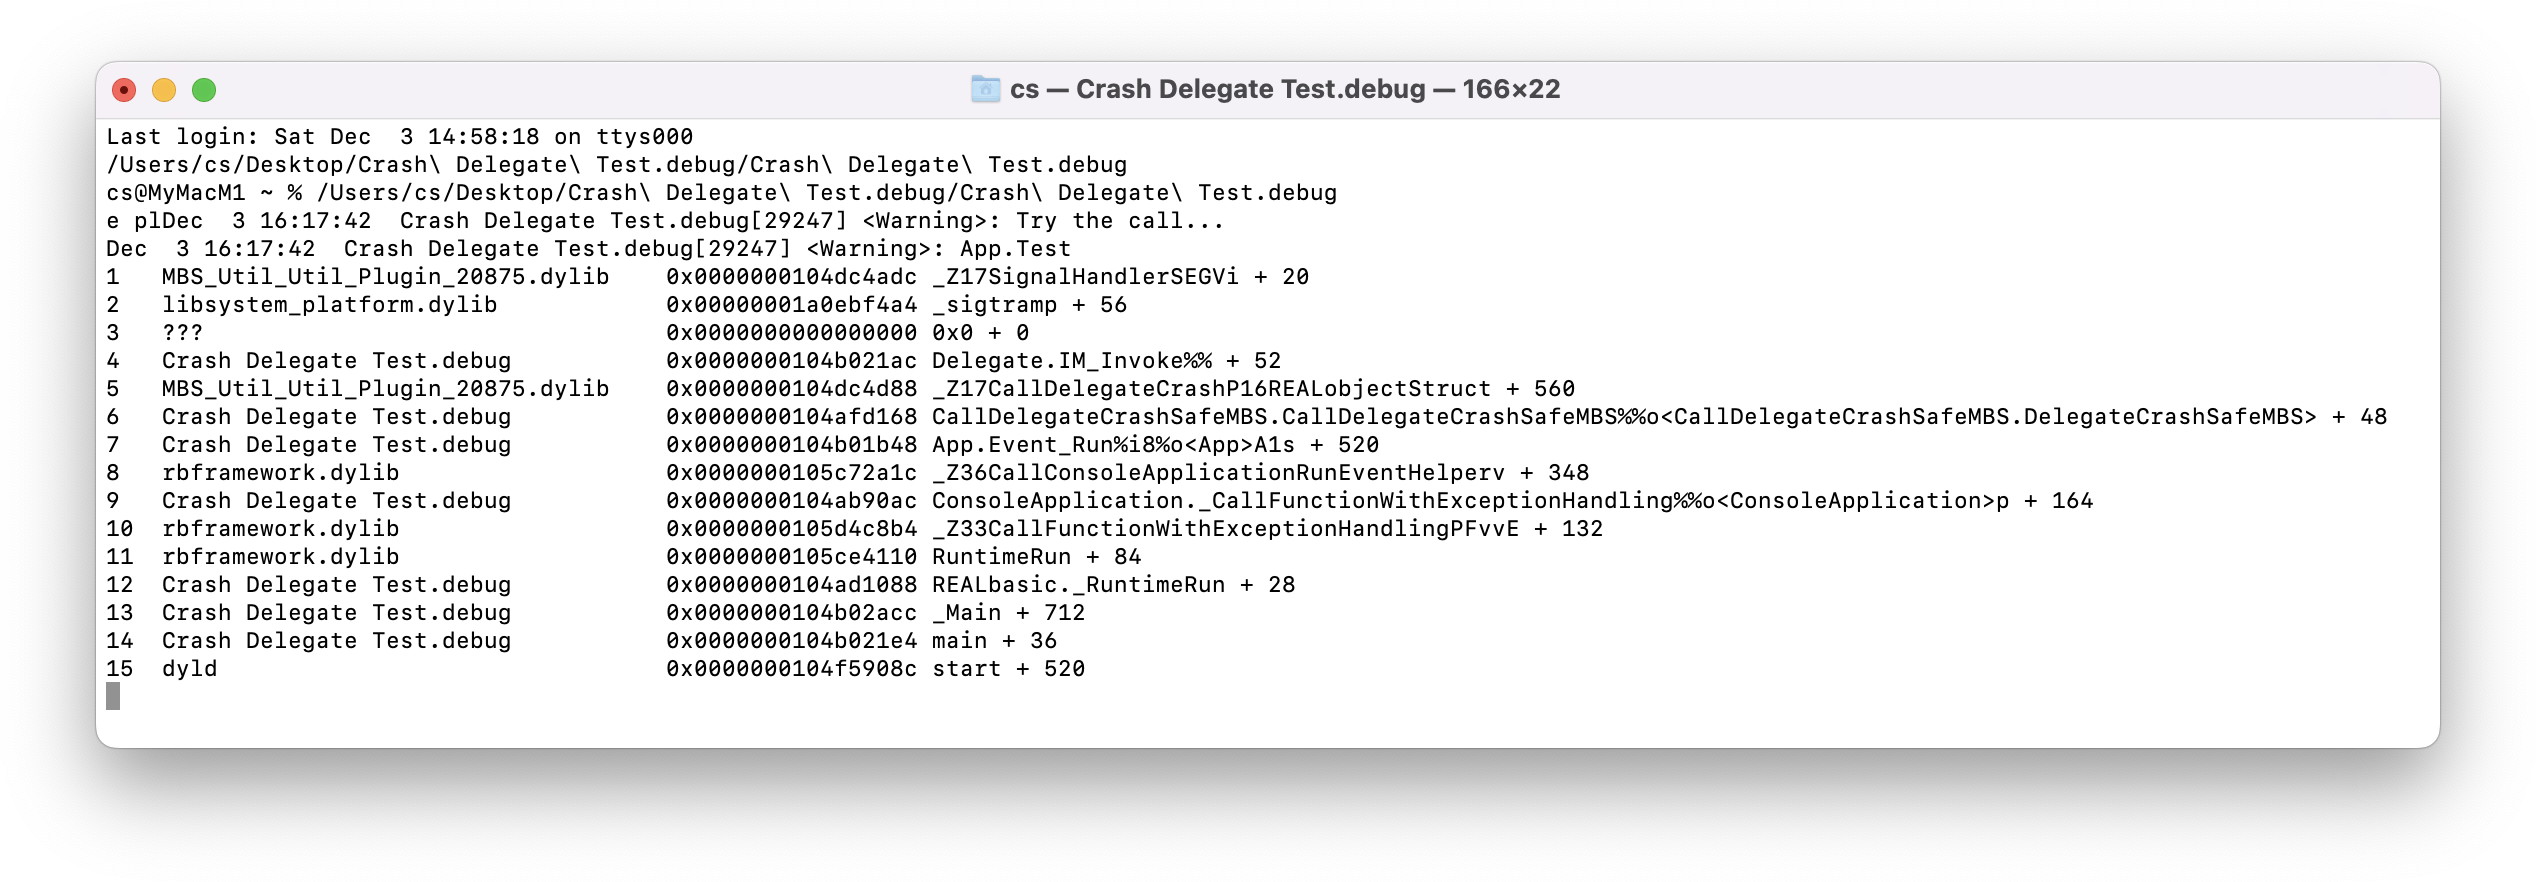
Since macOS Ventura was released in October, we got plenty of crash reports from Xojo developers. There are bugs in macOS Ventura when loading dynamic libraries. Loading a dylib crashes with a probability of around 1%. Now a full set of MBS Plugins has over 500 dylibs and in our tests the crashes usually happen in the higher ranges like after 300, 400 or 500 dylibs are loaded. The crash reports look like this:
First since there are several bugs and Apple fixes bugs, please install updates for MacOS Ventura. Also make sure you have recent versions of Xojo (2022r4.1) and MBS Plugins 22.5 (or 22.6pr4), so you benefit from fixes related to macOS Ventura.
Next, please reduce the number of plugins you use. MBS Plugins contain 500+ dylibs with thousands of classes, but you probably only need a few plugins. So instead of 50 plugins installed, you may just go with 10 to 20 and not see the crash described above. Please check dependencies here. You need at least Main plugin for version and license handling. If you use various MacOS related plugins, you also need MacBase for some base classes. But not everyone uses our XL, OCR or Phidgets plugins.
If you like to know what plugins you use, just look into the built application. For macOS open the package with contextual menu and look into Contents/Frameworks folder. For Windows and Linux, please looks in the Libs folder. You may then lookup plugin part names to find the plugin.
When Xojo still crashes on launch, just try again. Usually it works fine after one or two crashes. We hope Apple fixes their bugs in the future with an upcoming update. Or tells us what to change on linking to avoid this.
In MBS FileMaker Plugin we have a handy function: Window.PositionNextDialog function.
You can call this function in a script just before FileMaker shows a dialog. The plugin will watch for new dialogs to show up and the next dialog to come is adjusted. We check if you provided a new X/Y coordinate and if so move the dialog. If you got us a new width and height, we resize the dialog. And if you set the center flag, we finally center the window on screen.
Works fine on MacOS and Windows so far in various FileMaker versions. We hope the function will help people with multiple screens to position the dialogs better.
For next version (currently in 12.6pr4), we improved this to work on Windows for the progress window for Insert From URL script step. So you can show a nice download while you do your synchronisation, uploads and downloads. The plugin can then be used to move those dialogs out of the way. e.g. on Windows move it down on the screen, so it hides behind the task bar.
Please try it! And do not hesitate to contact us in case of questions.
Recently Norman got surprised about a change in a framework class. The EmailMessage class now has a computed property instead of a method pair for the Source property. While that doesn't change the functionality much, it does prevent you from subclassing and overwriting the methods.
Let's make diffs between the different versions of the framework classes. First attempt is to use Introspection, but for that we have to collect all the class names, which may be error prone. With introspection, we miss modules, global functions and many details like parameter names.
Did Become Active Triggered when the app becomes active.
Did Enter Background Triggered when the app enters the background.
Did Receive Memory Warning The app receives a warning from the operating system about low memory availability.
Significant time change The system posts this notification when, for example, there’s a change to a new day (midnight), a carrier time update, or a change to, or from, daylight savings time. The notification doesn’t contain a user info dictionary.
Will enter foreground Triggered shortly before an app leaves the background state on its way to becoming the active app.
Will resign active Triggered when the app is no longer active and loses focus.
And since scripts run later, we also provide evaluation of expressions available to run directly. This may include Let() statements for multiple statements together.
Welcome to the 24th and last door of our advent calendar. In this advent calendar I would like to take you on a journey through the GraphicsMagick component in December. Every day I will introduce you to one or more functions from this component. In this component you will find functions with which you can analyze images, convert them, change them with filters, draw them and much much more. In the end, you too can take the magic of GraphicsMagick to your images. I wish you a lot of fun in the process.
Today I will show you how to turn a rectangular image into a round one.
To say it at the beginning. There is no such thing as a round image. The illusion that an image is round is created by the alpha channel. This means that certain areas are transparent.
First, we load the image from the container again and determine the width and height of the image.
We first need the image as a square. So we determine the size of the shorter of the two sides. For this, we distinguish our procedure for Landscape and Portrait mode. With the function "GMImage.Crop" we crop the image as we already know it from door 7.
If [ $Width>$Height ]
	# Landscape
	Set Variable [ $SizeGeometry ; Value: $Height & "x" & $Height ]
	Set Variable [ $Size ; Value: $Height ]
	Set Variable [ $OffsetX ; Value: ($Width - $Height) / 2 ]
	Set Variable [ $OffsetY ; Value: 0 ]
Else
	# Portarait
	Set Variable [ $SizeGeometry ; Value: $Width & "x" & $Width ]
	Set Variable [ $Size ; Value: $Width ]
	Set Variable [ $OffsetX ; Value: 0 ]
	Set Variable [ $OffsetY ; Value: ($Height - $Width ) / 2 ]
End If
Set Variable [ $Geometry ; Value: $SizeGeometry & "+" &$OffsetX& "+" &$OffsetY ]
Set Variable [ $r ; Value: MBS( "GMImage.Crop"; $GM; $Geometry ) ]
Welcome to the 23th door of our advent calendar. In this advent calendar I would like to take you on a journey through the GraphicsMagick component in December. Every day I will introduce you to one or more functions from this component. In this component you will find functions with which you can analyze images, convert them, change them with filters, draw them and much much more. In the end, you too can take the magic of GraphicsMagick to your images. I wish you a lot of fun in the process.
Today I'm going to show you how to reduce the size of your image files.
If you want to store images in your database, images often consume a lot of space. But sometimes the images don't have to be that huge, because you only want to display them in a container.
On one hand, if available, you can use the function "GMImage.ExifThumbnail" to retrieve the thumbnail and write it to the database instead of the original image. But with many images the thumbnail cannot be retrieved easily and an error occurs or we get back an empty value. So this case we should catch for sure.
...
Set Variable [ $IMG ; Value: MBS( "GMImage.ExifThumbnail"; $GM; "abc.jpg") ]
If [ MBS("IsError") or $IMG="" ]
	Show Custom Dialog [ "Error" ; "Thumbnail cannot be retrieved¶" & $IMG ]
	Set Variable [ $r ; Value: MBS( "GMImage.ReleaseAll" ) ]
	Exit Script [ Text Result:    ]
End If
Set Field [ GraphicsMagick Advent::Image ; $IMG ]
...
Welcome to the 22th door of our advent calendar. In this advent calendar I would like to take you on a journey through the GraphicsMagick component in December. Every day I will introduce you to one or more functions from this component. In this component you will find functions with which you can analyze images, convert them, change them with filters, draw them and much much more. In the end, you too can take the magic of GraphicsMagick to your images. I wish you a lot of fun in the process.
Today I show you how you can combine pictures. It's almost Christmas and our monkey is still missing the right costume. This we want to put on him today. The Christmas hat is on a separate PNG image. That means we want to put the image with the Christmas hat on top of the image with our logo. For this we can choose from two functions GMImage.Composite and GMImage.CompositeXY. I would like to introduce the GMImage.Composite function first. First we specify the reference in which we want to have the result in our case this is the reference of the logo. Next is the reference of the image or workspace we want to combine with the image, in our case an image of the cap. The next parameter refers to how the second image is arranged to the first one. Our two images are the same size, so it makes no difference for us the way the two images are positioned in relation to each other, but if the images are different in size, for example the second image is smaller than the first, then it makes a difference whether we align the image to the upper left corner or centered. The following options are available to us:
For Windows we got a new checkbox in the preferences dialog:
Following the recurring tradition that any enhancement must have a checkbox to turn it off, we got a new checkbox to decide whether you like to have the search box for relationships.
Beside that, the dialog is a convenient way to put in the license key information and press the Register button. The license is then saved to the preferences dialog to make sure the plugin is registered permanently.
Welcome to the 21st door of our advent calendar. In this advent calendar I would like to take you on a journey through the GraphicsMagick component in December. Every day I will introduce you to one or more functions from this component. In this component you will find functions with which you can analyze images, convert them, change them with filters, draw them and much much more. In the end, you too can take the magic of GraphicsMagick to your images. I wish you a lot of fun in the process.
Yesterday we already looked at how we can draw with the basic shapes in GraphicsMagick. Today we would like to draw our own shapes. For this we have some functions in the plugin that we can use. We will draw our own shapes with paths. Let's imagine a pen. We tell this pen where it is and where it goes. Let's draw a triangle together. To do this, we first need to move our pen to the start position. For this we use the function GMImage.AddPathMovetoAbs in the parameters we specify the start coordinates for our point (50/50) in addition to the reference.
We have now specified an absolute position because we want to start exactly at these coordinates. But if you have a look at the documentation of GraphicsMagick you will notice that there is also a very similar function called GMImage.AddPathMovetoRel. The difference between these two functions is that we specify the absolute coordinates (the exact point where we want to place the pen) or the relative coordinates. The relative coordinates describe where the point is in relation to the old position. This means for example if we have a Relative Coordinate (1/1) we go one unit to the right and one unit down from the point where we are currently located. Most path drawing functions from the MBS FileMaker Plugin occur twice with this difference.
Check out the FileMaker Magazine website. Matt Petrowsky provides a huge collection of training videos around FileMaker. And recently he started a series of videos about our MBS Plugin:
Welcome to the 20th door of our advent calendar. In this advent calendar I would like to take you on a journey through the GraphicsMagick component in December. Every day I will introduce you to one or more functions from this component. In this component you will find functions with which you can analyze images, convert them, change them with filters, draw them and much much more. In the end, you too can take the magic of GraphicsMagick to your images. I wish you a lot of fun in the process.
Today I want to show you that with GraphicsMagick you can not only edit images, but we can also draw by ourselves. Today I will introduce you to the basic shapes.
To have a working environment on which we can work, we first use the GMImage.New function. This creates a working environment for us. We determine the size and the background color in the parameters. Here we draw a working environment of 500x500 pixels and a white background color.
Did you know, that you can run JavaScript in a WebViewer directly and get back the result right away?
In FileMaker Pro, Claris Pro and your FileMaker iOS SDK based app, you can use WebView functions from MBS FileMaker Plugin. Please take a look at the WebView.Evaluate function:
You pass in the reference to the web viewer and whatever JavaScript expression you like to evaluate it. Just like the Evaluate() in FileMaker, but with JavaScript. If you name your WebViewer "web" on the current layout and you have a website loaded ("about:blank" is enough), you can run a calculation like this:
MBS( "WebView.Evaluate"; "web"; "1+2" )
The function returns the result 3 directly and as a number, not text. Use FM.DataType function to check that, if you like. Of course you can also return text or JSON objects. Just send them through JSON.stringify:
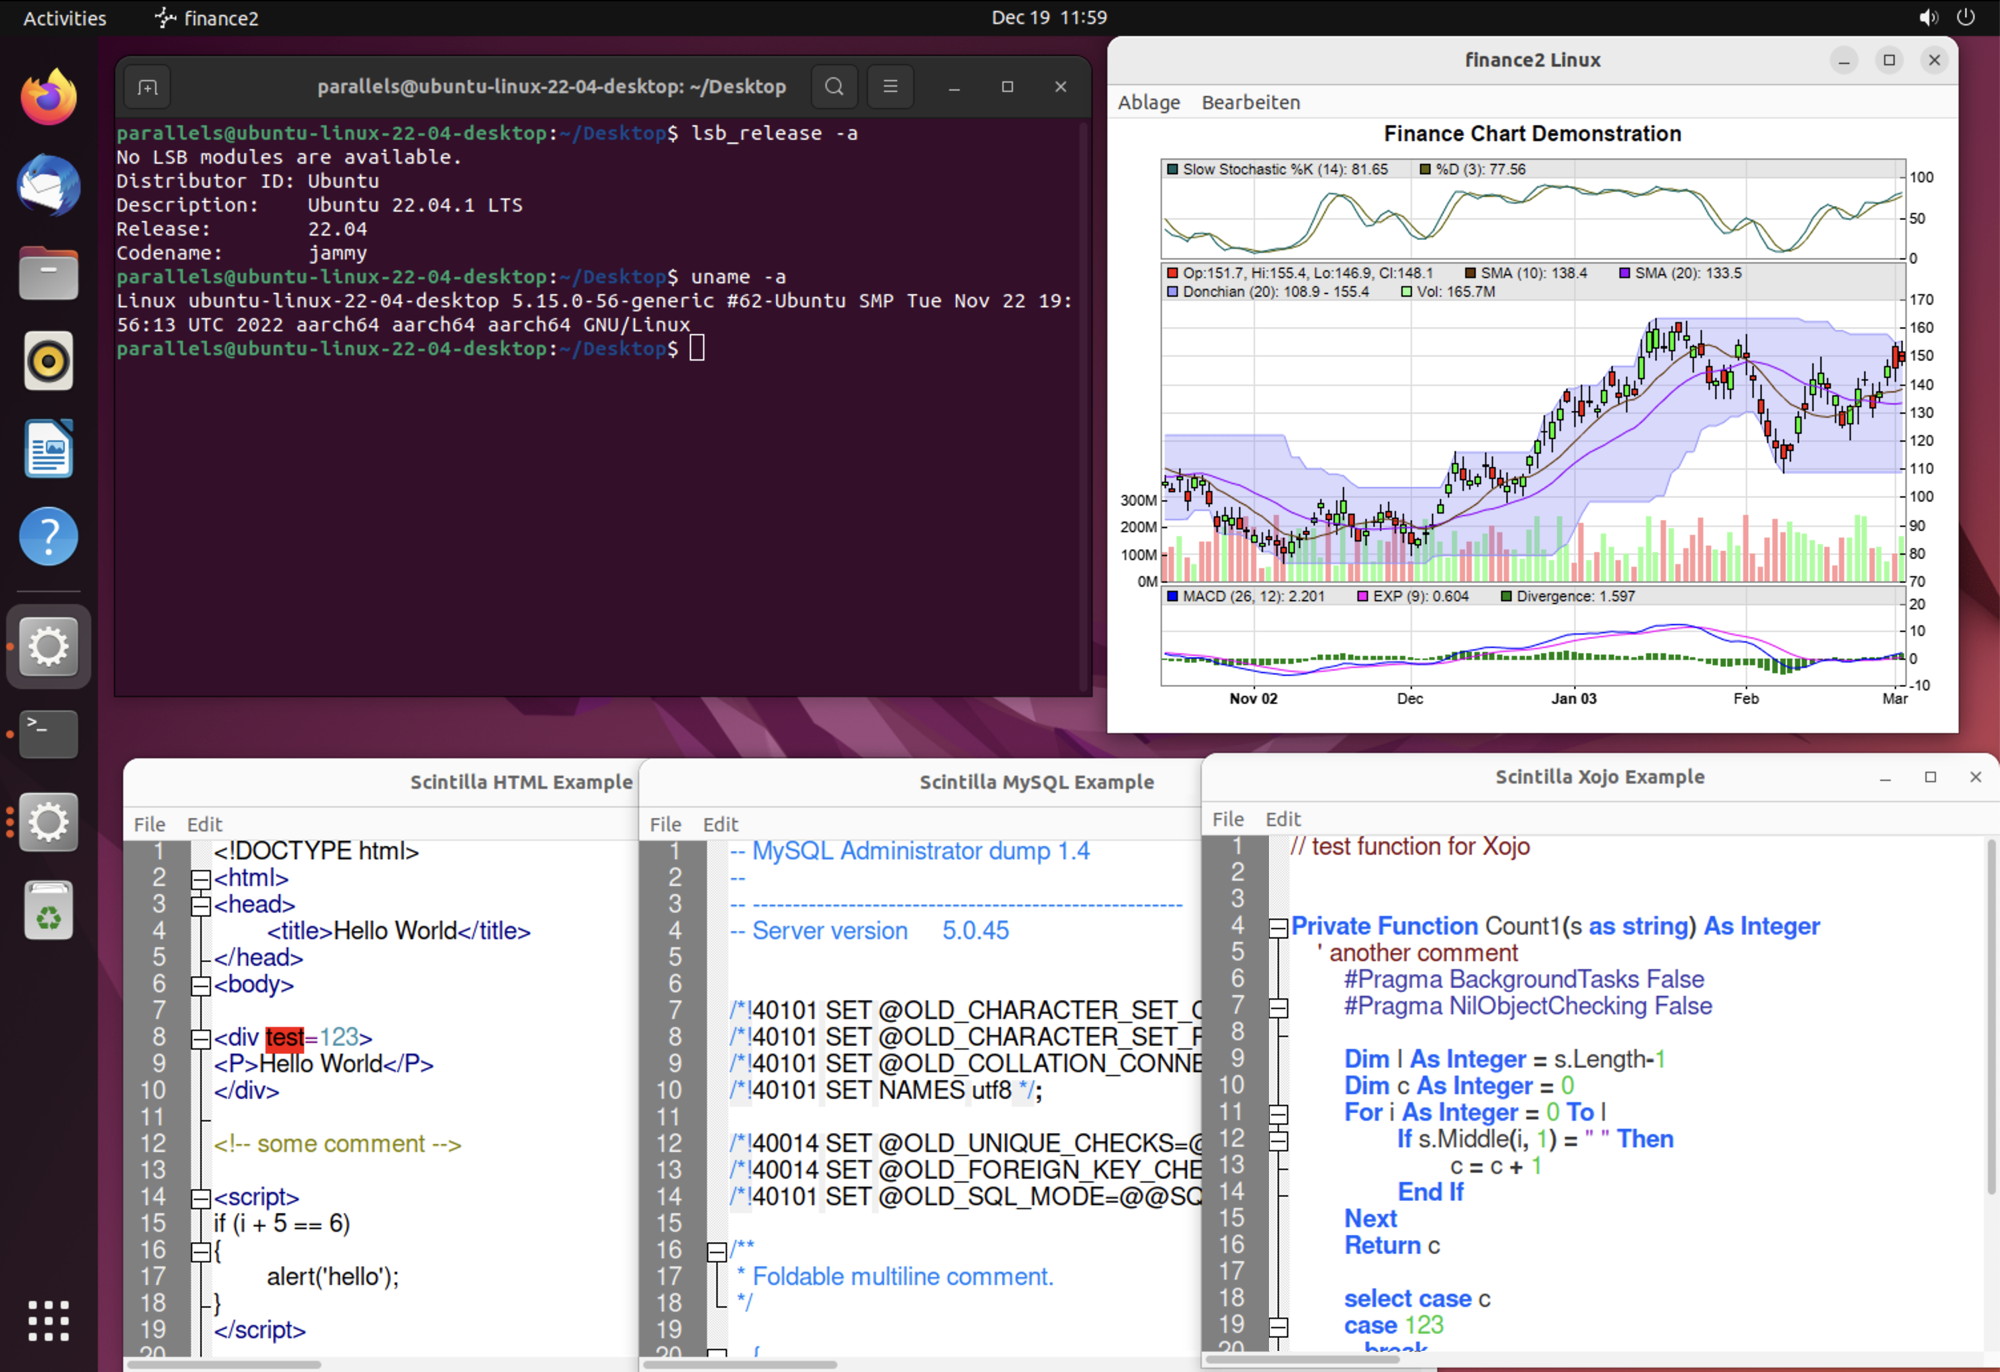
We are happy to report, that Xojo with our plugins work fine in 64-bit ARM target for Linux:
Today we got Scintilla control (ScintillaControlMBS) updated to include a built-in library, so the control can be easily used out of the box without providing your own library.
The ChartDirector examples also work, but you need to install fonts and tell our plugin where they are with the CDBaseChartMBS.SetFontSearchPath function.
Since Xojo 2022r4 introduced building desktop, console and web applications, we see an increase in Linux developers asking about it. We'll add more Linux 64-bit ARM support and fix issues as we find them for the upcoming 23.0 release in January. Please report problems you find.
Welcome to the 19th door of our advent calendar. In this advent calendar I would like to take you on a journey through the GraphicsMagick component in December. Every day I will introduce you to one or more functions from this component. In this component you will find functions with which you can analyze images, convert them, change them with filters, draw them and much much more. In the end, you too can take the magic of GraphicsMagick to your images. I wish you a lot of fun in the process.
We have already seen in door 2 that we can query some information about an image. If we have photos, but also the metadata created by the device when taking the picture are very interesting. Today I want to show you how you can retrieve some of this information.
We use the functions GMImage.GetAttribute for this purpose. But before we start with this function I would like to introduce you to name related functions. On the one hand we have the GMImage.GetAttributesJSON function. It returns the attributes that have been created before as JSON.
Welcome to the 18th door of our advent calendar. In this advent calendar I would like to take you on a journey through the GraphicsMagick component in December. Every day I will introduce you to one or more functions from this component. In this component you will find functions with which you can analyze images, convert them, change them with filters, draw them and much much more. In the end, you too can take the magic of GraphicsMagick to your images. I wish you a lot of fun in the process.
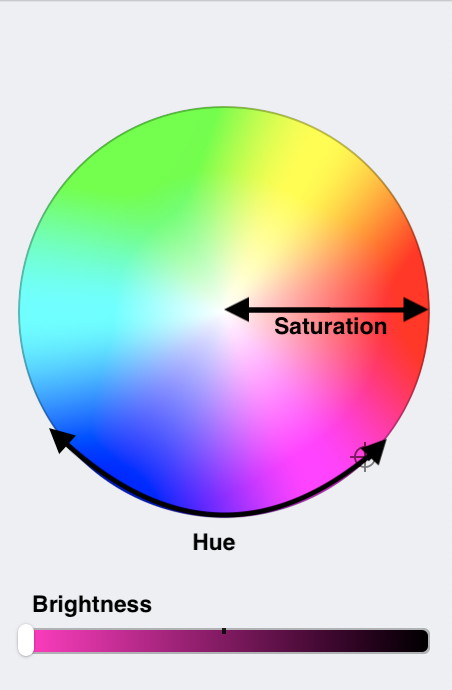
Do you think that our monkey is a bit pale around the nose? Today we want to change that, because we also have a function that can change the saturation of an image. The GMImage.Modulate function. But not only the saturation can this function influence but also the brightness of the image and the hue. So we can change the HSB values of an image. In the parameters we then specify the corresponding values. If one or more of these three values should not be changed in an image, then we write a 100 in the parameters. The 100 is the neutal value.
Brightness and saturation are relatively easy to understand if we set the brightness to a value greater than 100 then the image becomes brighter and if the value is less than 100 then it becomes darker. Similarly, if the saturation is greater than 100, the saturation will be higher, and if it is less than 100, the saturation will be lower. We can move within the value range from 0 to 200. With the Hue factor it is not so clear what we are actually doing. Here, too, the values move between 0 and 200. We are familiar from many programs that we can specify colors with the help of the color wheel.
Welcome to the 17th door of our advent calendar.
In this advent calendar I would like to take you on a journey through the GraphicsMagick component in December. Every day I will introduce you to one or more functions from this component. In this component you will find functions with which you can analyze images, convert them, change them with filters, draw them and much much more. In the end, you too can take the magic of GraphicsMagick to your images. I wish you a lot of fun in the process.
Today it will be really colorful, at least today we want to try some backgrounds for our logo. Our original image has a red background.
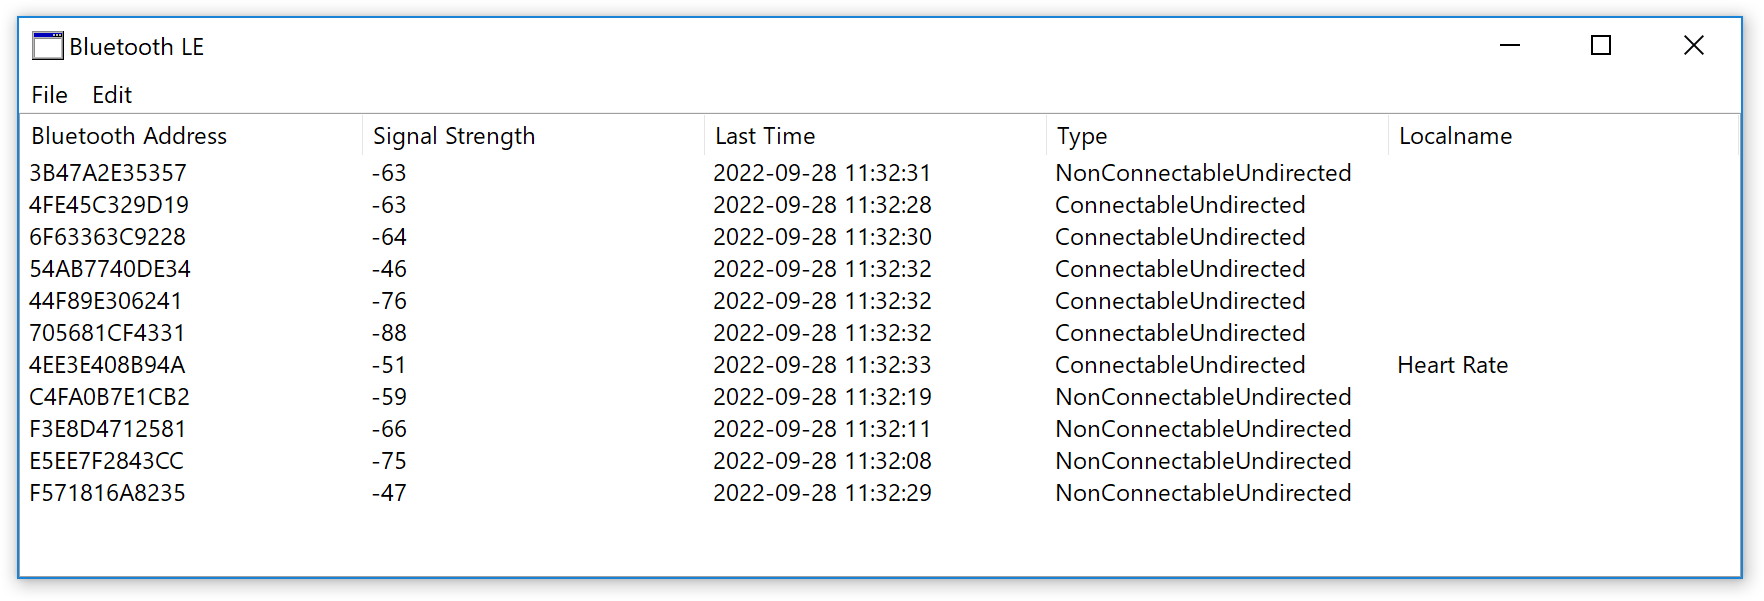
Connecting to a bluetooth LE device on Windows and reading values is a multi step asynchronous procedure. You have to manage the state in your code to know where you are. You call plenty of functions and later you receive the callbacks to react to them, either as event or delegate method call. Here are the steps you may need to do:
Use WindowsBluetoothLEDeviceMBS.FromBluetoothAddressAsync to create the device object from the address.
If you alternatively have the Id, you can use FromIdAsync method instead.
When your delegate is called later, take the device object and continue.
Welcome to the 16th door of our advent calendar. In this advent calendar I would like to take you on a journey through the GraphicsMagick component in December. Every day I will introduce you to one or more functions from this component. In this component you will find functions with which you can analyze images, convert them, change them with filters, draw them and much much more. In the end, you too can take the magic of GraphicsMagick to your images. I wish you a lot of fun in the process.
Today I'll introduce you to the GMImage.Channel function that allows us to extract individual channels from an image. We have already seen in some effects that we can use individual channels, whether we want to apply blur or if we want to give the image a noise with red pixels. Channels are a great thing. Let's take a closer look at them. In the function GMImage.Channel we first specify the reference in the parameters and then the ChannelType. Each channel type is assigned a number which must be specified in the parameters. Here we see a list of channels that are available to us:
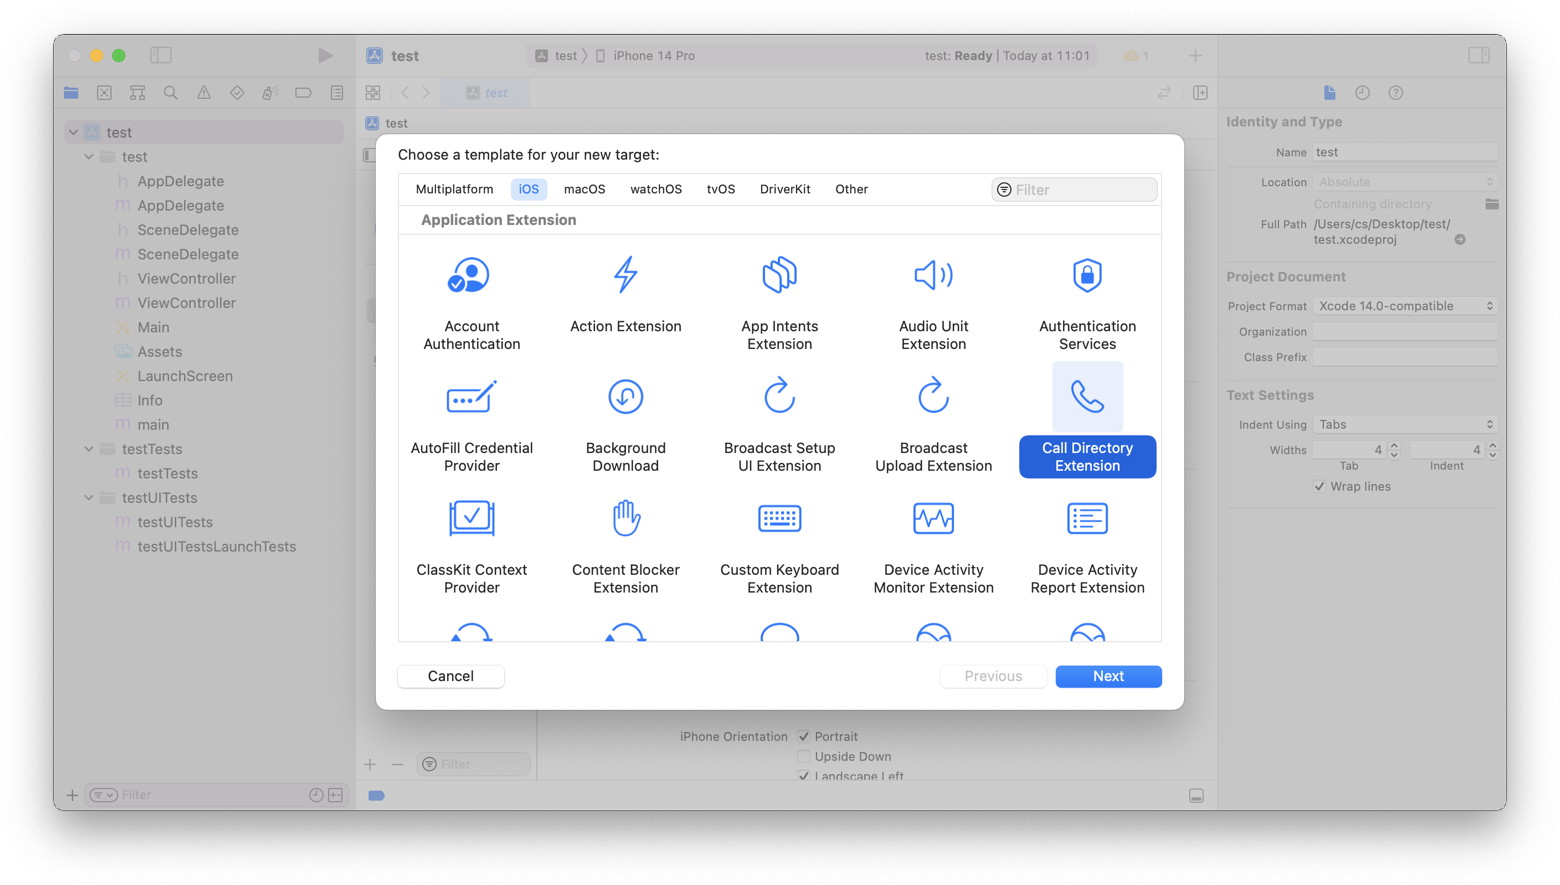
You can add a CallKit extension to your Xojo iOS application. This extension can provide names for phone numbers to iOS as well as block specific numbers. The extension is a background application, which is called from time to time to be asked for new data. Your main application may manage a database of phone numbers, which is then used by the extension.
Since we can't write the CallKit in Xojo right away, we need to write the extension in Xcode. In Xcode you make a new iOS App project. The name doesn't matter, but it may be good to match it to your main application in Xojo and use the same bundle identifier, so Xcode can setup provision profile for you. Then we you have the settings open for the project, on the bottom below the targets is a plus button. There you can add a new target for the Call Directory Extension.
Welcome to the 15th door of our advent calendar. In this advent calendar I would like to take you on a journey through the GraphicsMagick component in December. Every day I will introduce you to one or more functions from this component. In this component you will find functions with which you can analyze images, convert them, change them with filters, draw them and much much more. In the end, you too can take the magic of GraphicsMagick to your images. I wish you a lot of fun in the process.
Yesterday I introduced you to the Blur effect. Today I will show you the opposite effect: Sharpen. This effect sharpens your image. We use the GMImage.Sharpen function. Again we have the same parameters as with the Blur function. First our reference, then the radius which indicates from which area we use the information for the effect and our sigma which describes the effect in more detail.
Short before year's end, we get a 4th release for Xojo for 2022. Download here. Release Notes here. This release brings a couple of important bug fixes and new features, so let's dig into it:
Linux 64-bit for ARM
Finally we get 64-bit ARM support for Linux. And if you like to try it, be sure to install our MBS Plugins 22.6pr3 (or newer) to get support for the new platform. We worked on this for a year now and already updated all plugins to build for it. This includes MBS Xojo ChartDirector Plugin for our chart engine. The MBS Xojo XL Plugin is not yet updated for Linux 64-bit ARM as we plan to do this with the upcoming 4.1 release of LibXL. Let us know if you run into a class or function not working on Linux 64-bit on ARM, so we can check. Please try it for your desktop, console and web projects.
For other plugin vendors, it looks like Björn from Einhugur.com is also busy to update.
(more)
Welcome to the 14th door of our advent calendar. In this advent calendar I would like to take you on a journey through the GraphicsMagick component in December. Every day I will introduce you to one or more functions from this component. In this component you will find functions with which you can analyze images, convert them, change them with filters, draw them and much much more. In the end, you too can take the magic of GraphicsMagick to your images. I wish you a lot of fun in the process.
The GraphicsMagick functions also provides many effects that we can apply to our images. In the Advent Calendar we would like to introduce a few of these effects. Today I will introduce you to the Blur effect. With this effect you blur the image. You can use the function GMImage.Blur for this purpose. We can pass three different parameters to this function. First of all again our reference, then the Radius of the Gaussian that means we specify the size of the radius from which we get our information for the respective pixel.
We also specify the value Sigma, which is the standard deviation of the Laplacian.
The Blur effect is influenced by the combination of the last two parameters, so you can vary these two parameters to your taste.
Here are examples of the variation of values.
The year 2022 will end in less than three weeks. Do you need some more licenses?
You can order licenses for 2023 or later and have invoice, delivery and payment done in 2022. This way you secure the current pricing and the possibility to keep upgradeability for older licenses.
And of course you can order updates for several years in advance for all your MBS products.
As all our Xojo and DynaPDF plugin licenses are per developer, you should check if you got a new developer in your team this year and adjust licenses to match team size.
For MBS FileMaker Plugin please check if you have enough license for the number of seats or servers you have in use. If you upgrade to unlimited seats or servers, the plugin won't need to check the usage counts.
Especially if you run on a budget and you want to spend some money in the old year, you can buy updates for several years in advance.
If you need help to decide what Xojo, FileMaker or plugin license you need, we may be able to assist you.
Welcome to the 13th door of our advent calendar. In this advent calendar I would like to take you on a journey through the GraphicsMagick component in December. Every day I will introduce you to one or more functions from this component. In this component you will find functions with which you can analyze images, convert them, change them with filters, draw them and much much more. In the end, you too can take the magic of GraphicsMagick to your images. I wish you a lot of fun in the process.
The GraphicsMagick also provides many effects that we can apply to our images. In the Advent calendar we would like to introduce a few of these effects. Today I will introduce you to the Swirl effect. With this effect you can turn the center of your image. We use the function GMImage.Swirl for this purpose. In the parameters we can specify the reference and the angle by which the image should be rotated.
Recently a client suggested to make a custom function to call CURL functions anywhere with just a function call. But instead of building a convenience function into the plugin, we provide you the recipe on how to make such a custom function, so you can change it.
Our function will do GET and POST with text in and out. That is the most requested case for various REST or SOAP web services. You may also add variations to return result as container to taking a container for upload or a file path as in- or output. So here is our easy script:
We recently got our TimerMBS class (22.6 or later) to help in cases, where using a menu on Windows stops your background threads. On macOS and Linux your threads continue to run when the user clicks on the menu and takes a while to make a choice.
So for Windows you can run the following code in your app open event to install a global TimerMBS and have it yield time. This makes sure that your main loop runs at least 10 times a second, even if a menu is open.
Sub Opening()
#if TargetWin32
//starttimertoyieldinordertokeepthreadsrunningwhenyouusePopupMenusStatic timer As TimerMBS
timer = New TimerMBS(100, False)
timer.Yield = True#EndIfEnd Sub
Alternatively, you would only enable it, when a thread is running. And then stop it later when the thread is done.
Please try and let us know whether it works well for you.
Welcome to the 12th door of our advent calendar. In this advent calendar I would like to take you on a journey through the GraphicsMagick component in December. Every day I will introduce you to one or more functions from this component. In this component you will find functions with which you can analyze images, convert them, change them with filters, draw them and much much more. In the end, you too can take the magic of GraphicsMagick to your images. I wish you a lot of fun in the process.
The GraphicsMagick also provides many effects that we can apply to our images. In the Advent calendar we would like to present a few of these effects. Today I will show you the effect that turns your image into an oil painting. For this we use the function GMImage.OilPaint. Here we have the original image that we want to change.
Welcome to the 11th door of our advent calendar.
In this advent calendar I would like to take you on a journey through the GraphicsMagick component in December.
Every day I will introduce you to one or more functions from this component.
In this component you will find functions with which you can analyze images,
convert them, change them with filters, draw them and much much more. In the end, you too can take the magic of GraphicsMagick to your images. I wish you a lot of fun in the process.
The GraphicsMagick also provides many effects that we can apply to our images.
In the Advent calendar we would like to introduce a few of these effects.
Today I will show you how to add a noise effect to your image. So we want to bring in a noise effect.
For this we have two functions that we can use. We have the simpler function GMImage.AddNoise which
adds a noise to the image which we can define in the parameters. We have a total of 6 noise types that we can specify.
UniformNoise = 0
GaussianNoise = 1
MultiplicativeGaussianNoise = 2
ImpulseNoise = 3
LaplacianNoise = 4
PoissonNoise = 5
In the parameters we specify the appropriate number. In this script line, for example, the noise type ImpulseNoise was selected.
Welcome to the 10th door of our advent calendar. In this advent calendar I would like to take you on a journey through the GraphicsMagick component in December. Every day I will introduce you to one or more functions from this component. In this component you will find functions with which you can analyze images, convert them, change them with filters, draw them and much much more. In the end, you too can take the magic of GraphicsMagick to your images. I wish you a lot of fun in the process.
Today we want to write a text in our image. For this we use the function GMImage.Annotate. As in most functions, we first specify the reference, then the text follows. Optionally we can specify where exactly the text should be, the area we specify in the same way as in door 7 for the image section. First the size in pixels and then the x and y offset ( widthxheight+offsetX+offsetY ). We can also set the text alignment. Last but not least, we can even specify that the text should be rotated by a certain number of degrees. If you want you can set not only the text, but also the font, the color of the text, the font size, the color of the text border and the thickness of the text border. For these individual settings we have one function each. It is best if we look directly at the sample code together.
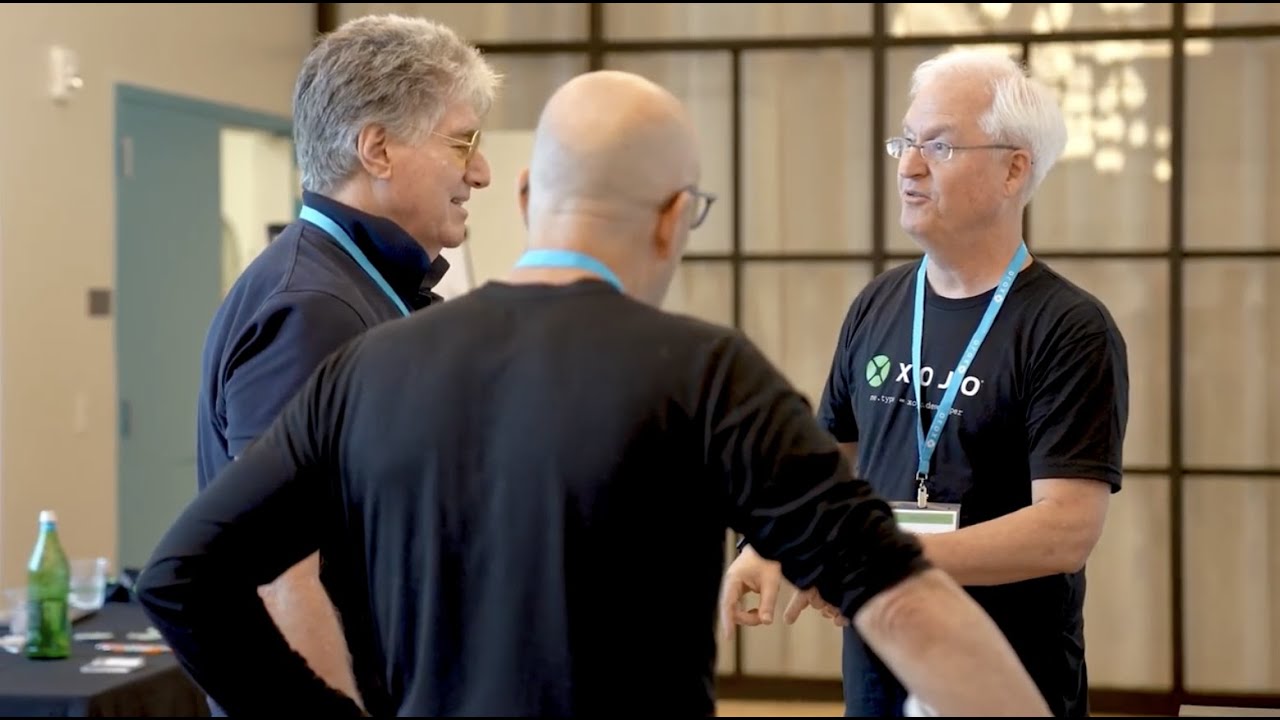
There was a smaller two day conference in Nashville a few months ago, where we had a lot of fun to meet Xojo developers from around the world. Check out the video:
Welcome to the 9th door of our advent calendar. In this advent calendar I would like to take you on a journey through the GraphicsMagick component in December. Every day I will introduce you to one or more functions from this component. In this component you will find functions with which you can analyze images, convert them, change them with filters, draw them and much much more. In the end, you too can take the magic of GraphicsMagick to your images. I wish you a lot of fun in the process.
Today I'm going to tell you a little bit about a function that is quite inconspicuous, but once provided me with great services. I got from a customer at the very beginning of my FileMaker time the order that I should sort out all pages from a scanned PDF file that are empty. I accepted the order and thought, that can't be difficult, there must be a simple function you can use to detect if the page is empty or not. What can I say it wasn't that easy and I was thinking for a long time about how to do it until I found the GMImage.AveragePixelValue function. This function gets the average color value of pixels in an image or a certain area which can be defined with optional parameters in the function.
Today we like to show you how to use our WebHook functions in MBS FileMaker Plugin to listen for incoming requests and send them from another place within the reachable network. Since a VPN and tunnelling can extend the range, you may even trigger from a FMP in one country to a FMP in another country. You may have various uses of triggering a script within the network.
For example you may have a need to trigger a script on another FileMaker Pro to do something for you. That may be to remotely start a batch process, which takes a while. You may not have our plugin in FileMaker Go, but you can trigger a script on a FileMaker Pro to do something like cropping a picture. Or the FileMaker Go may enter data for an invoice. Then it could send a request to a FileMaker Pro to print that invoice after it is finished.
Let us start with creating a web hook locally in one FileMaker Pro. We request to keep connections open and disable auto answer. Then we bind to a new random port here. We set the script to trigger and finally query the port number we got. Then we write this in a record, so others can read this configuration value to send something. Since the port is random, it changes each time our FileMaker Pro launches. Here is the script:
Set Variable [ $$WebHooks ; Value: MBS("WebHook.Create") ]
# we need to keep connection open
Set Variable [ $r ; Value: MBS("WebHook.SetMode"; $$WebHooks; 1) ]
Do you think that our monkey is a bit pale around the nose? Today we want to change that. We also have a method from the GM16ImageMBS class that can change the saturation of an image. The modulate method. But not only the saturation can this method influence but also the brightness of the image and the hue. So we can change the Hsb values of an image. In the parameters we then specify the corresponding values. If one or more of these three values should not be changed in an image, then we write a 100 in this place in the parameters. The 100 is the neutal value.
image.modulate(100,100,100)
Brightness and saturation are relatively easy to understand if we set the brightness to a value greater than 100 then the image becomes brighter and if the value is less than 100 then it becomes darker. Similarly, if the saturation is greater than 100, the saturation will be higher, and if it is less than 100, the saturation will be lower. We can move within the value range from 0 to 200. With the Hue factor it is not so clear what we are actually doing. Here, too, the values are between 0 and 200. We know that from many programs we can specify colors with the help of the color wheel.
Welcome to the 8th door of our advent calendar. In this advent calendar I would like to take you on a journey through the GraphicsMagick component in December. Every day I will introduce you to one or more functions from this component. In this component you will find functions with which you can analyze images, convert them, change them with filters, draw them and much much more. In the end, you too can take the magic of GraphicsMagick to your images. I wish you a lot of fun in the process.
Today I would like to show you how to convert your image into a black and white image or how to display it in grayscale. Let's start with the grayscale. For this we use the function GMImage.SetType. This function sets the repression type of the image. We can specify the following values:
Welcome to the 7th door of our advent calendar. In this advent calendar I would like to take you on a journey through the GraphicsMagick component in December.
Every day I will introduce you to one or more functions from this component.
In this component you will find functions with which you can analyze images, convert them,
change them with filters, draw them and much much more.
In the end, you too can take the magic of GraphicsMagick to your images.
I wish you a lot of fun in the process.
Today I want to show you how to crop an image.
For this we use the GMImage.Crop function.
This function returns an image section that you have to define in the parameters before.
As with the other functions, we first specify the reference and then a geometry.
The geometry describes the cut-out from the image.
First we can define how big such a section should be - again in pixels.
First the width and then the height which we separate from each other with an x. But now we don't only
want to define the size of the section, but also the position.
For this reason we have to set the offsets for X and Y in addition to the size information.
The offsets determine the distance from the upper left edge.
If we set a value for X we move away from the side edge, if we set a value for Y we move away from the top border.
These two values can be appended with a plus.
We will make an example now.
We would like to crop the image so that it is square and shows the center of the image.
Here we see the code:
First there is the question about the scope of the token and how to use this for IMAP. So the scope string lists various identifiers separated by a space character and a few of those identifiers are URLs. You can lookup them in the documentation from Microsoft, but we have a few common ones:
Only SMTP:
Set Variable [ $scope ; Value: "https://outlook.office365.com/SMTP.Send"
Only IMAP:
Set Variable [ $scope ; Value: "https://outlook.office365.com/IMAP.AccessAsUser.All"
IMAP and SMTP:
Set Variable [ $scope ; Value: "https://outlook.office365.com/SMTP.Send https://outlook.office365.com/IMAP.AccessAsUser.All"
More with POP3 and profile data and offline access:
Set Variable [ $scope ; Value: "openid profile offline_access https://outlook.office365.com/SMTP.Send https://outlook.office365.com/POP.AccessAsUser.All https://outlook.office365.com/IMAP.AccessAsUser.All"
It may be good to keep this narrow and maybe only ask for SMTP most times so the user is not frightened that for sending emails you also need to read all their existing emails.
(more)
Welcome to the 6th door of our advent calendar.
In this advent calendar I would like to take you on a journey through the GraphicsMagick component in December.
Every day I will introduce you to one or more functions from this component.
In this component you will find functions with which you can analyze images,
convert them, change them with filters, draw them and much much more.
In the end, you too can take the magic of GraphicsMagick to your images.
I wish you a lot of fun in the process.
Today we want to rotate the image and for this we use the function GMImage.Rotate.
In the parameters we first specify the reference and then the number of degrees by which we want to rotate the image.
The image will be rotated clockwise if the degree is positive and counterclockwise if the degree is negative.
In our example file, I have included two buttons that rotate the image clockwise and counterclockwise.
Both buttons call the same script. When pressing the buttons, different script parameters are passed,
so we know which button was pressed.
Clockwise passes the 0 and counterclockwise passes the 1. By how many degrees we want
to rotate the image we specify in the appropriate field. The script looks like this:
Set Variable [ $direction ; Value: Get(ScriptParameter) ]
If [ $direction=1 ]
	Set Variable [ $degrees ; Value: Abs ( GraphicsMagick Advent::RotationDegree )*-1 ]
Else
	Set Variable [ $degrees ; Value: Abs ( GraphicsMagick Advent::RotationDegree ) ]
End If
Set Variable [ $GM ; Value: MBS("GMImage.NewFromContainer"; GraphicsMagick Advent::Image) ]
Set Variable [ $r ; Value: MBS( "GMImage.Rotate"; $GM; $degrees ) ]
Set Field [ GraphicsMagick Advent::Image ; MBS( "GMImage.WriteToContainer"; $GM ; "abc.png" ) ]
Set Variable [ $r ; Value: MBS( "GMImage.Release"; $GM ) ]
We recently added MongoChangeStreamMBS class to watch changes in the database. You can monitor a database, a collection or the whole system. We show you today on how to use that in Xojo.
Welcome to the 5th door of our advent calendar. In this advent calendar I would like to take you on a journey through the GraphicsMagick component in December. Every day I will introduce you to one or more functions from this component. In this component you will find functions with which you can analyze images, convert them, change them with filters, draw them and much much more. In the end, you too can take the magic of GraphicsMagick to your images. I wish you a lot of fun in the process.
Today I would like to show you how you can scale an image according to your wishes. For this we use the GMImage.Scale function. In the parameters you have to enter the reference and a geometry. The geometry can look like the geometry we already know (width x height), but we can now also define other things in the geometry and are not limited to a fixed size of the image. So that you can try it yourself we have created a field in the sample file (This will be available on December 24) in which you can enter the geometry to test it. The script looks like this. We always load a fresh image from a file and then scale it with the function. In our container, the image is then scaled, we save the image there as usual and release the reference again.
Set Variable [ $GM ; Value: MBS("GMImage.NewFromFile"; "/Users/sj/Desktop/abc.png") ]
Set Variable [ $r ; Value: MBS( "GMImage.Scale"; $GM; GraphicsMagick Advent::GeometrieScal ) ]
Set Field [ GraphicsMagick Advent::Image ; MBS( "GMImage.WriteToContainer"; $GM ; "abc.png" ) ]
Set Variable [ $r ; Value: MBS( "GMImage.Release"; $GM ) ]
Let's first try the geometry we already know. I have entered 500x100 in the text field. The image is then scaled so that the smaller of the two values is assumed, so the image gets a height of 100 and the width is scaled proportionally. For example, if we were to specify 50 for the width and 100 for the height, then the image would adjust to the 50 and scale the height proportionally.
Welcome to the fourth door of our advent calendar. In this advent calendar I would like to take you on a journey through the GraphicsMagick component in December. Every day I will introduce you to one or more functions from this component. In this component you will find functions with which you can analyze images, convert them, change them with filters, draw them and much much more. In the end, you too can take the magic of GraphicsMagick to your images. I wish you a lot of fun in the process.
Today I will show you how to paint a border around an image. The focus is on the GMImage.Border function. This function again requires our reference.
Set Variable [ $r ; Value: MBS( "GMImage.Border"; $GM) ]
When we use the function like this, a gray fine border is drawn around the image by default. If the image is very large, as you can see here, it is not so noticeable.
Sometimes you may have a situation, where you want to try something, that may crash. This may be a problem outside your control like a system or library function. Or some pointer reading may cause a page fault and you like to try it. Or some code produces crash reports for your users and you like to catch it and show a bug reporter dialog to get more details on why it crashes in a method.
We got recently a CallDelegateCrashSafeMBS module with a CallDelegateCrashSafeMBS method, that calls a method on your behalf. If it crashes, we raise a DelegateCrashExceptionMBS to inform you about it. The error message may tell the error like: "Delegate crashed with invalid pointer access."
Welcome to the third door of our advent calendar. In this advent calendar I would like to take you on a journey through the GraphicsMagick component in December. Every day I will introduce you to one or more functions from this component. In this component you will find functions with which you can analyze images, convert them, change them with filters, draw them and much much more. In the end, you too can take the magic of GraphicsMagick to your images. I wish you a lot of fun in the process.
So far we have requested information from images, But later in December we would like to change the images and would like to see this change when we put a filter on the image, for example. For this we need to be able to write the edited image which is in our working memory back to a file. How this works I will show you today.
First we think about where we want to have our file. Do we want to write it into a file or into a container, for both we need again different functions.
Let's start with the case that we want to write the image into a file. For this we use the function GMImage.WriteToFile. This function writes a single image to the disk in the parameters we specify the image reference and the path to which the image should be saved. If you want to let the user choose in a dialog where to save the file you can use the functions from the FileDialog component. With these functions you can customize your save dialog by adding a text, a heading and many other settings. After selecting a file we can then get the file path and save the image with the GMImage.WriteToFile function to the specified location. In the script example we have used such a dialog.
Welcome to the second door of our advent calendar in this advent calendar.
I would like to take you on a journey through the GraphicsMagick component in December.
Every day I will introduce you to one or more functions from this component.
In this component you will find functions with which you can analyze images,
convert them, change them with filters, you can draw them and much much more. In the end,
you can also take the magic of GraphicsMagick to your images. I wish you a lot of fun with it.
Today I want to find out with you some information about the loaded images. We will start with the size of the images.
So we want to find out height and width.
First we load our image into memory as we saw it yesterday.
In our example there is a single image in the container.
Now we can retrieve different information.
The width with the function GMImage.GetWidth and
the height with GMImage.GetHeight function.
The reference is passed to the functions in the parameters and we then get back the desired value.
Welcome to the first door of our advent calendar.
In this advent calendar I would like to take you on a journey through the GraphicsMagick component.
Every day I will present you one or more functions from this component.
In this component you will find functions with which you can analyze images,
convert them, change them with filters, draw on them and much much more.
In the end, you can also take the magic of GraphicsMagick to your images.
I wish you a lot of fun with it.
Today I will show you how to load an image from a file or container so that you can edit it in the later doors.
When loading an image we have the possibility to load it from a container.
For this we use the GMImage.NewFromContainer function.
We pass the container to this function in the parameters.
With this we load the image into the working memory and get a reference number as return which we can use in the other steps.
If we have an image file with multiple images in a container,
we have the function GMImage.NewImagesFromContainer that
gives us a list of reference numbers. Each image in the container is loaded into memory and has its own reference number.
The image cannot only be a container value, but also a file on your computer.
You can then load this via the file path.
We use the GMImage.NewFromFile function for this.
We specify the native path in the parameters.
If you have a FileMaker path, the path must first be converted to a native path. Then use the Path.FileMakerPathToNativePath function to do this.
If you want, you can optionally specify a codec here that will take care of decoding the image.


 New in this prerelease of version 12.6 of the
  New in this prerelease of the 22.6 plugins:


 Welcome to the 18th door of our advent calendar. In this advent calendar I would like to take you on a journey through the GraphicsMagick component in December. Every day I will introduce you to one or more functions from this component. In this component you will find functions with which you can analyze images, convert them, change them with filters, draw them and much much more. In the end, you too can take the magic of GraphicsMagick to your images. I wish you a lot of fun in the process.
 Short before year's end, we get a 4th release for Xojo for 2022.
  The year 2022 will end in less than three weeks. Do you need some more licenses?

 Do you think that our monkey is a bit pale around the nose? Today we want to change that. We also have a method from the
  After the