Top 10 from the MBS Plugin in 2022
In this article I would like to present you 10 highlights from the MBS FileMaker Plugin innovations of 2022.
One Plugin for FileMaker AND Claris
Recently, the first version of the Claris product line has been released. We are proud to announce that our plugin also work on the new platform and you can use it there as usual. The best thing is that you can use the same plugin file for FileMaker and the new Claris. This is the first and currently the only plugin worldwide that works on both platforms equally.
MongoDB

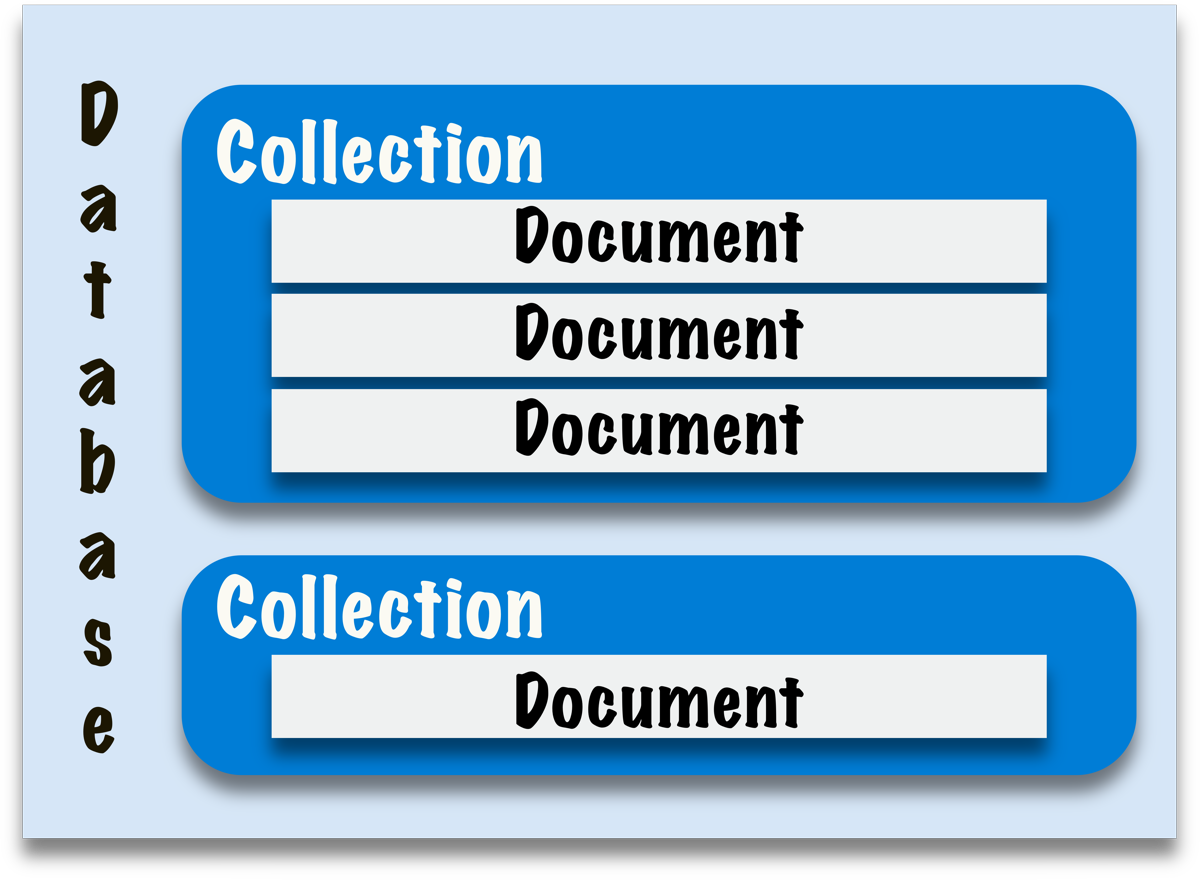
The MongoDB section joined the plugin in release 12.3 and has been developed ever since. You can use FileMaker to access MongoDB databases, read, write and delete data. The special thing about Mongo DB is that it is not a rational database that is limited by relationships and tables, but is based on a JSON-like structure that also allows unusual queries. For example, you can formulate searches to see who has been in your company longer, the carpet in the warehouse or your employee. In rational databases, your carpet wouldn't normally appear in the same table as your employee. So you would have to design a separate table to be able to make this query. In Mongo DB, the records, here called documents, can coexist in the same collection and a simple query can be made.
In Release 12.5, another significant innovation was added for this area. You can execute transactions on MongoDB since then. Normally, every change in the database is immediately applied as soon as it has been made. But this is not always desirable, e.g. when it comes to security relevant things where multiple records have to be changed. If in the meantime the connection breaks we don't know in which state our database is, which records have been changed, which not. For this there are the transactions, with which we can tell the database to make all changes at once or reject all made changes. If you would like to try Mongo DB, please check out our examples.
WebHook
At the end of 2021, we have added the WebHook component to the plugin family. With this component we can run a small web server in our solution on FileMaker Pro, Server or iOS SDK based applications to receive HTTP requests and trigger appropriate scripts. Many smart home devices work with this technology and you can process data from these devices directly in FileMaker. In 2022, we expanded this component, and in 2023 we will add some more functions as well.

Our WebHook functions got in 12.0 a new timeout property to prevent connections staying open forever without sending a request. You can set the time for the TimeOut yourself. To do this, use the new WebHook.SetTimeOut function. The default value is 5 minutes. The time is specified in seconds. Furthermore you can use WebRequest.GetState to get the current state of a web request. With the function WebHook.SetMaximumRequestSize we set the maximum allowed request size.This allows you to disconnect sockets, which send too much data. By default there is no limit, so people can send requests with giga byte big payload. Depending on your use can it may be worth to limit request size to a reasonable value. For example if you receive notifications from your phone system, you may set the maximum size to 10000 bytes and a timeout of 60 seconds for WebHook.SetTimeOut function. That is probably 10 times more than needed, but may avoid some malicious user from sending a ton of useless traffic.
Matrix
Since some versions we have the possibility to work with matrices. The two-dimensional list is made up of rows and columns and can store data. Whether it is numbers or strings. In 2022 we got some new functions for this plugin part. The new function Matrix.Rotate transposes the given matrix, that means the original rows become the columns and vice versa. This can be very useful for some calculations. If we apply the function two times in a series to a matrix we get the original matrix again, we can see this in the example.
Until this year you could only assign names to individual rows and columns. Especially with large matrices this could be very annoying if we had to do it by hand. For this reason we have developed the two new functions Matrix.SetRowNames and Matrix.SetColumnNames. You can pass these functions a list in the parameters that name your rows or columns. Another new function is Matrix.ConvertDataType. With it you can convert the data types of the whole matrix or a certain area into a certain data type. For example, if you have a matrix with only numbers as text strings, but you want to have these values as numbers, you can use this function to convert the values to numbers. You can convert the values of a matrix into Number, Container, Date, Time, TimeStamp or Text.
DynaPDF
DynaPDF has been giving you the ability to do more with your PDFs for years. You can load existing PDF files with DynaPDF and then edit them and you can also create files yourself. Make a PDF from existing images or create a PDF form according to your wishes, DynaPDF offers you the right tools for this and much more. The appropriate DynaPDF license must be purchased separately to the plugin. We have this year again some innovations in DynaPDF.
Sometimes it can be quite difficult to display fonts the way you want them to be displayed, especially when there is the factor of two different output languages. Under Windows you can now create an alternate font list. These glyphs are used when the desired font cannot be used. Multiple lists can be created because different fonts and languages require different fallback fonts. For example, one could create a list for proportional fonts and another one for fixed pitch fonts, or different lists for different languages. Each list can be activated or deactivated with DynaPDF.ActivateAltFontList as often as you like. Changing the active alternate font list is very fast and causes no overhead. Once a font list was created it can be filled with data with DynaPDF.SetAltFonts. A font list that is no longer needed can be deleted with DynaPDF.DeleteAltFontList. Please note that alternate font lists are used only, if complex text layout was enabled. This can be done by setting the flag ComplexText with DynaPDF.SetGStateFlags. Alternate font list are tested if one more glyphs were not found in the current font. Since the fonts in the list are used as fallback they should be compatible to the active font in regard to properties like serif, sans serif, proportional or fixed pitch, and so on. A list should be sorted by priority and not by name. That means index 0 should contain a font name that is most probably the best match. If this one was not available or incompatible then the next font in the list will be tested until the end of the list was reached. If no suitable font was found then system fonts are tested. The fonts in the list should support the language that must be output. Otherwise, the fonts can never be selected. An alternate font list can be arbitrary large but it is usually best to restrict the number fonts in a list to speed up processing.
With the new function DynaPDF.SetSpaceWidthFactor you can now set the space width factor. The space width factor is used by DynaPDF.ExtractText to determine whether the distance between two text records or glyphs should be interpreted as space character. PDF files do often not contain space characters. Depending on the font type, i.e. fixed pitch or proportional fonts, different default widths are used during text extraction. However, the full space width is mostly too large to find spaces. Therefore, the text extraction algorithm multiplies the default space width with the space width factor to find suitable values.
You can also use the new DynaPDF.SetTemplBBox function to change the dimensions of your bounding box for your template. By using a template (a page loaded from a document), you can place the same content several times into a new document, e.g. 4 pages on one.
With the function DynaPDF.SetRenderingIntent we can define how our solution should interpret colors in an image. For this we have the choices: AbsoluteColorimetric, Perceptual, RelativeColorimetric and Saturation. The new functions DynaPDF.GetImageFileCount and DynaPDF.GetImageContainerCount are similar in their functionality. Both functions indicate how many images a multi-page TIFF file contains. With DynaPDF.GetImageContainerCount this file may also come from a container.
Error Log
For years we already have the isError function in the MBS FileMaker Plugin. We can call this after a MBS function to see if the previous MBS function returned an error. If you use many MBS functions in a script this can get confusing and it might be enough for you, e.g. if you are testing a script, to know if a plugin function in the whole script throws an error at all. For this we have developed two new functions. With the HadErrors function you get back the number that is currently in the error counter. This will be incremented by one whenever a MBS function returns an error. If you want to log the errors of a script, you first have to call the ClearErrors function to set the Error Count to 0. At the end of the script you can then call the HadErrors function. It becomes even more comfortably for the developers, because we collect the errors in an error log and give them out collected as JSON for you. For this we have now the new function ErrorLog. Such a JSON that you get back from the ErrorLog function can look like this:
[
	{
		"function":	"test",
		"result":	"[MBS] Unknown function: test",
		"parameter":	["test", 1, "Hello"],
		"fileName":	"Kontakte",
		"scriptName":	"test Errors",
		"currentTimeStamp":	"23.06.2022 09:28:34"
	},
	{
		"function":	"DynaPDF.Print",
		"result":	"[MBS] DynaPDF.Print is only supported for Windows. Please use PDFKit.Print on Mac.",
		"parameter":	[
			"DynaPDF.Print",
			1,
			"Hello"
		],
		"fileName":	"Kontakte",
		"scriptName":	"test Errors",
		"currentTimeStamp":	"23.06.2022 09:28:34"
	}
]
If you want to add an individualized entry to this error log, for example if you got an error with Get(LastError), you can do this with the AddToErrorLog function.
Autocompletion of variable names for Mac users
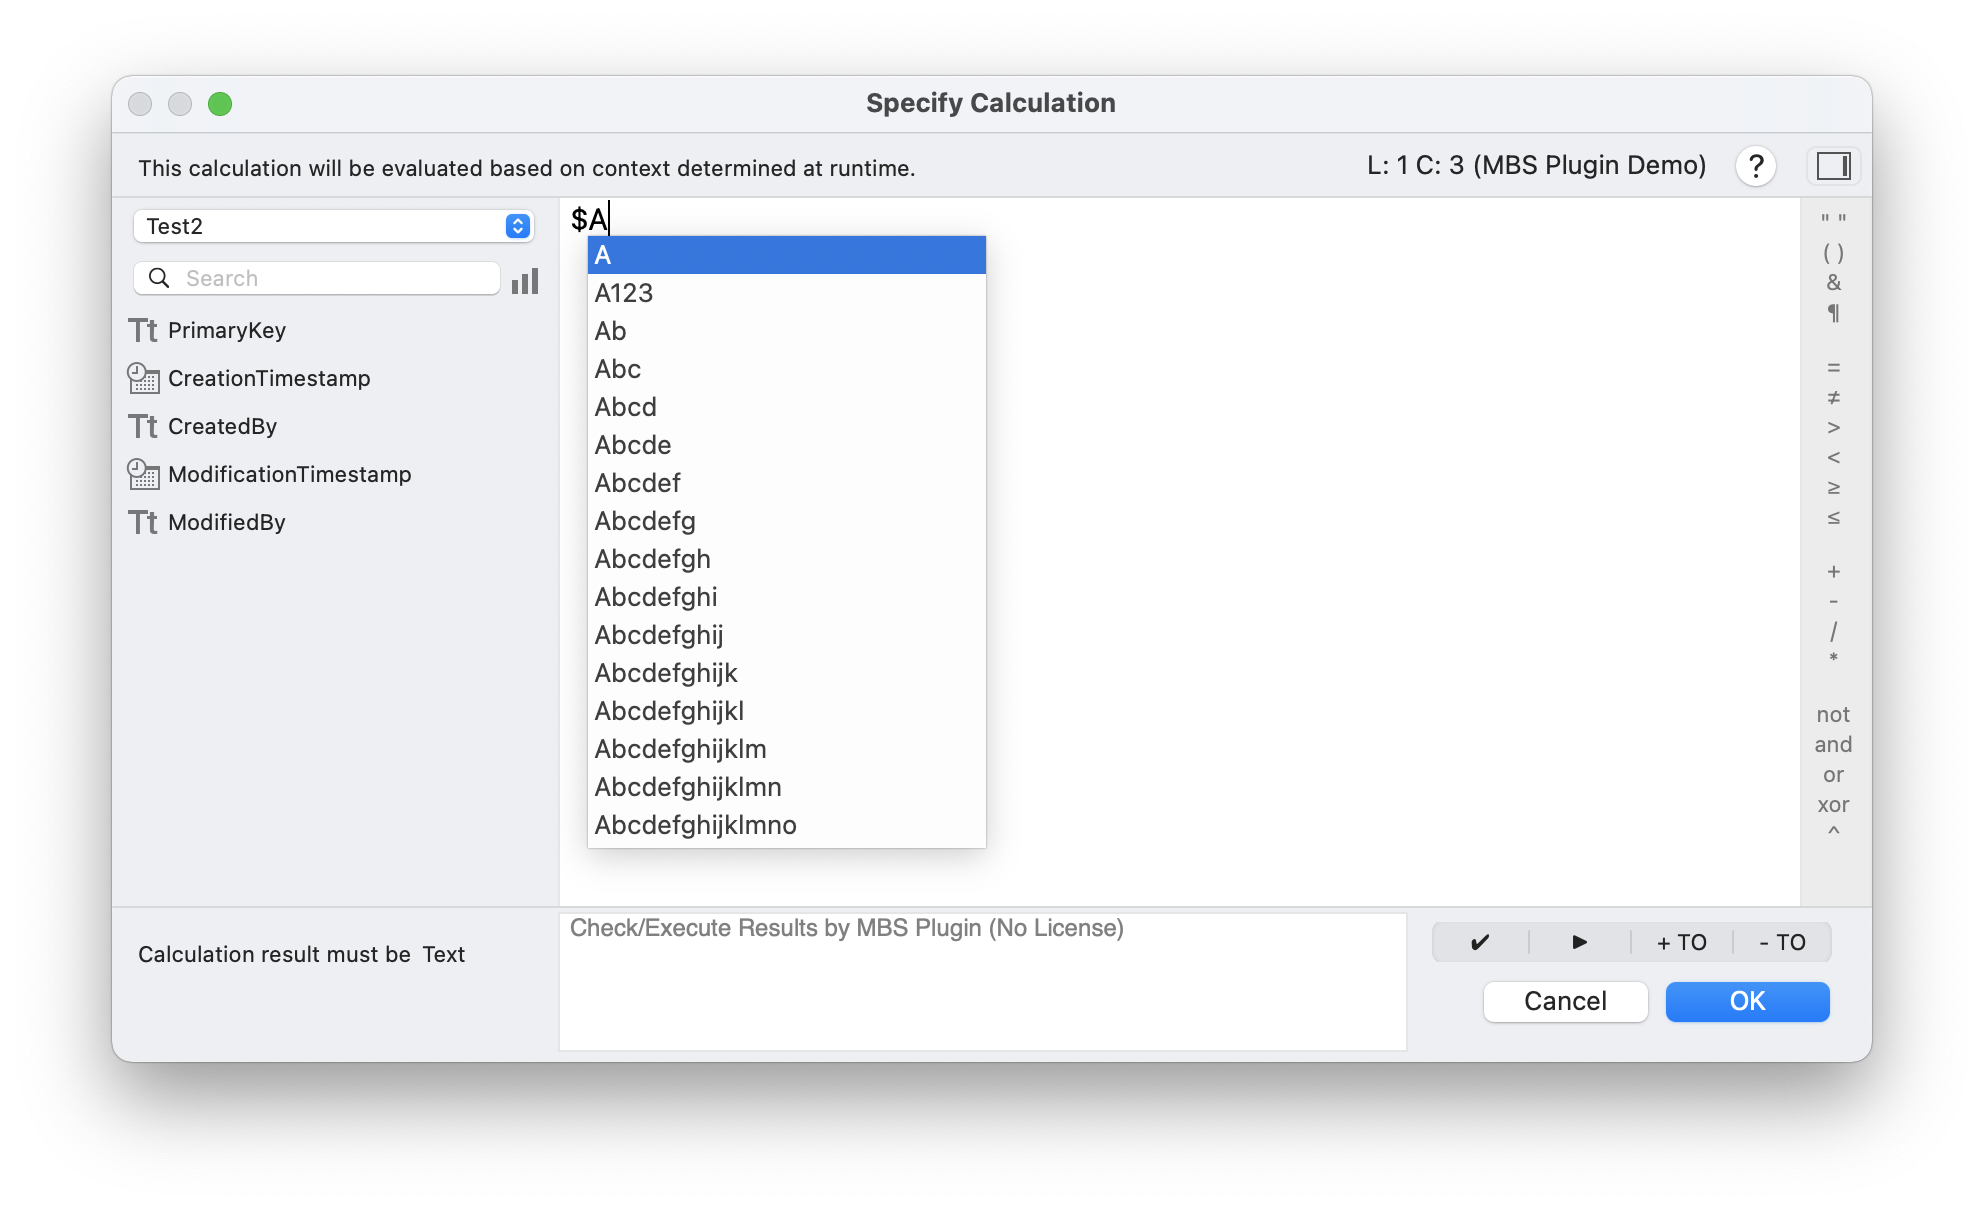
We have also extended our free developer features for Mac users. The feature that I want to show you now was often requested from us. We have integrated the autocompletion of variable names. The list of variable names is displayed in a popup menu when you type a $ sign in the formula editor. You can then select a variable from this list. If you enter more than one character, the list will be narrowed down further. The autocompletion works also for Global Variables if they are initialized in the same script or if they are initialized in the script with @variable followed by the variable name in a comment. This tool will be very useful for writing scripts. For Let-statements we can additionally auto complete local variable names starting with ¢ (cent), _ (underscore) and ~ (tilde) characters.

But that is not all. We extended the autocompletion to the function names of the MBS FileMaker Plugin. If you want to write a MBS function in a formula dialog you will get the function names suggested. This selection list will be specified the more text you enter. Our function names always have a similar structure. First we write the component and then with a dot separated the actual name of the function. If you enter only the name of the component and a dot, you can see all the functions of a given component. If there are many, you can even scroll through the list. If you then confirm a name, the rest of the function is completed with placeholder parameter names, so that you can easily insert your own parameters without forgetting any.
We also have another new feature in the formula editor. We have now included the buttons for syntax checking and test output in a button bar that has two new buttons, which are labeled +TO and -TO. The TO stands for Table occurrence. This means that we can switch off and on the display of the table association to a field name in the formula editor by pressing a button. Especially with long table names the hiding makes sense, because it makes the formula clearer.
Photo Picker for iOS

With the Photo Picker you can integrate a panel to import images from photos library in your iOS SDK App. It queries the photos library without the need of a permission dialog. With 16 new functions you can handele your photos easily. With the PhotoPicker.Available function you can check if you can use the functions on the system where your app is installed. With the function PhotoPicker.SetSelectionLimit you can limit the amount of photos you can select. The PhotoPicker.Present function presents the photo picker view. In this view we can select the photos. After selecting the photos we want to do something with the photos, for this we have to set a script that will be called after the photos are selected. We set the script, that will be started, before opening the Photo Picker, with the PhotoPicker.SetScript function. With the function PhotoPicker.ImageCount we can then determine how many images were selected and PhotoPicker.File can read out the file path by specifying the index. With the function PhotoPicker.Error we can determine whether and which error occurred while loading the image. We have included an example to try it out in the plugin. A more detailed description you can find in the blog article PhotoPicker for iOS with FileMaker iOS SDK
Search field in the relationship graph
Windows users can now celebrate, because we have a new search field in the relationship graph with which you can search in this graph. In the Mac, we have this control already built-in a while ago. But until now it was not possible in Windows despite all our efforts. We wish you a lot of fun with this goodie. If you want to know more about it, please have a look at our article Search relationship graph for Windows.

WinPhotoAcquire
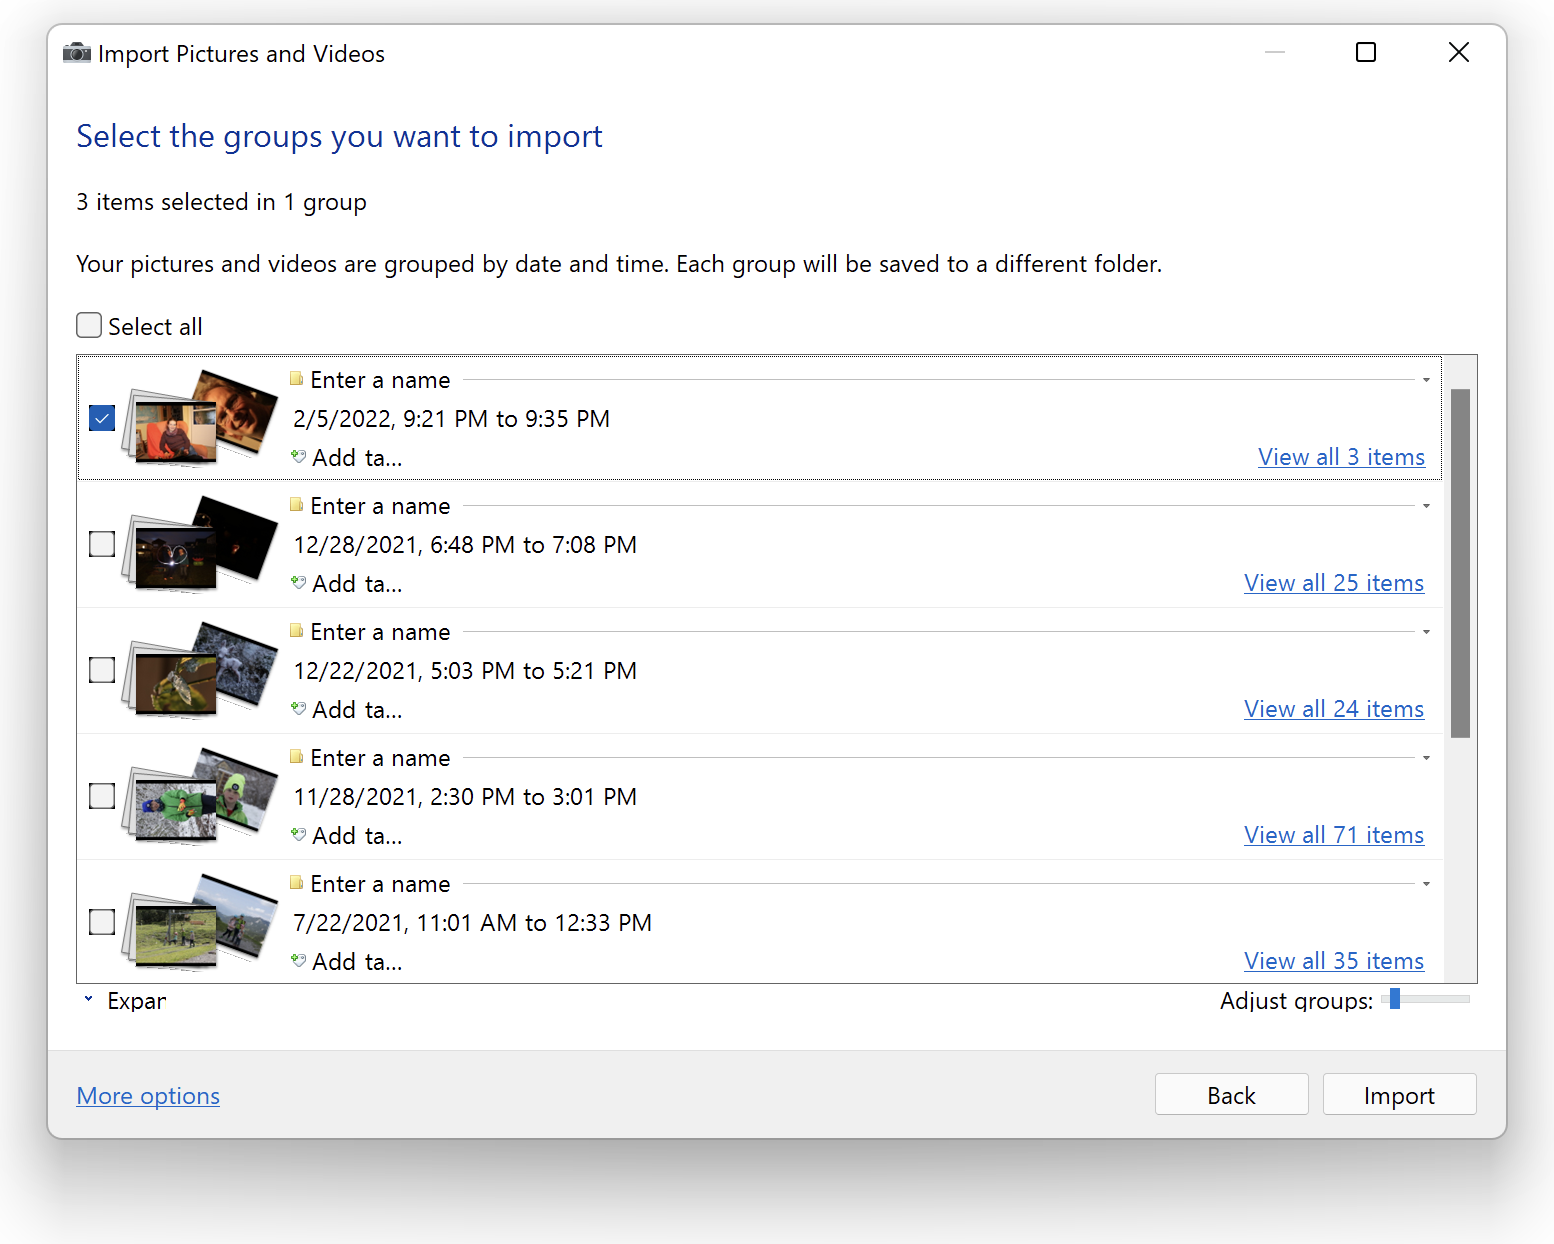
We have a new component in the plugin that may make the heart of Windows users beat faster. With the new component WinPhotoAcquire you can use the standard Windows dialogs to import image files. It works for digital cameras, scanners and many other devices. You can find more information about it in an extra blog article about the new component. Article: Windows Photo Acquire for FileMaker

I hope you were inspired by one or two of the ideas you saw here and that you can take them with you into your daily work. If you are missing a functionality in your everyday work, then please write to us and we will see if we can help you and who knows, maybe your idea will be in our Top 10 next year. Until then, I wish you all the best and a successful year 2023.