GraphicsMagick in FileMaker, part 18
| 🎄 |
| 18 of 24 |
 Welcome to the 18th door of our advent calendar. In this advent calendar I would like to take you on a journey through the GraphicsMagick component in December. Every day I will introduce you to one or more functions from this component. In this component you will find functions with which you can analyze images, convert them, change them with filters, draw them and much much more. In the end, you too can take the magic of GraphicsMagick to your images. I wish you a lot of fun in the process.
Do you think that our monkey is a bit pale around the nose? Today we want to change that, because we also have a function that can change the saturation of an image. The GMImage.Modulate function. But not only the saturation can this function influence but also the brightness of the image and the hue. So we can change the HSB values of an image. In the parameters we then specify the corresponding values. If one or more of these three values should not be changed in an image, then we write a 100 in the parameters. The 100 is the neutal value.
Set Variable [ $r ; Value: MBS( "GMImage.Modulate"; $GM; 100; 100; 100) ]
Brightness and saturation are relatively easy to understand if we set the brightness to a value greater than 100 then the image becomes brighter and if the value is less than 100 then it becomes darker. Similarly, if the saturation is greater than 100, the saturation will be higher, and if it is less than 100, the saturation will be lower. We can move within the value range from 0 to 200. With the Hue factor it is not so clear what we are actually doing. Here, too, the values move between 0 and 200. We are familiar from many programs that we can specify colors with the help of the color wheel.
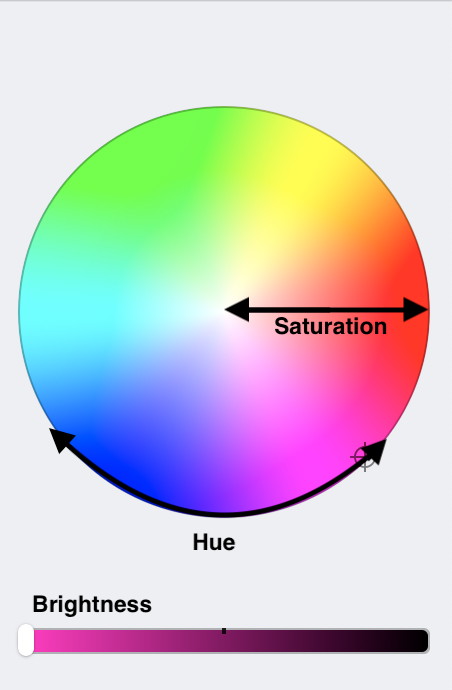
The color can be determined on this color wheel by 3 values. Once the brightness of the circle, this would be determined by the slider under the color circle, the saturation of the color, we determine this by the position of the point inside the circle. The more we come to the outer part of the circle the stronger is the saturation. Our hue is determined by the angle on the color circle. The three values together then describe a color. So if we enter a value of Hue <100, we have to imagine that we rotate all colors on the image in our color circle clockwise. If we enter a number greater than 100 then we rotate counterclockwise by a certain value. We don't work with degrees, but with values between 0 and 200 because 100 is the neutral value. If you want to work with degree numbers you have to convert the value accordingly (degree number/1.8). Let's have a look at the monkey. We want to move 90 degrees clockwise on the color wheel in our image. That means first we calculate 90/1.8 which results in 50. Since we want to move clockwise on the color circle we must now subtract the 50 from the normal value of 100. We get an input of 50, which we can then pass to the function. Before we try this out, let's mentally reproduce this. If we take the red of our background and move it clockwise by 90 degrees on the color circle, we get a purple background. And if we now send the image through the function we see it works.

If we would move our original image 90 degrees counterclockwise on the color wheel (Hue=150) our background would be green. Of course, as you can see, we do this not only with the background, but with every pixel in the image.

So that you can try out the function to your heart's content, three fields have been added to the sample project where you can enter the values for Saturation Brightness and Hue yourself.

The corresponding script looks like this:
Set Variable [ $GM ; Value: MBS("GMImage.NewFromContainer"; GraphicsMagick Advent::Image) ]
Set Variable [ $r ; Value: MBS( "GMImage.Modulate"; $GM; GraphicsMagick Advent::brightness; GraphicsMagick Advent::saturation; GraphicsMagick Advent::Hue ) ]
Set Field [ GraphicsMagick Advent::Image ; MBS( "GMImage.WriteToContainer"; $GM ; "abc.png" ) ]
Set Variable [ $r ; Value: MBS( "GMImage.ReleaseAll" ) ]
Set Field [ GraphicsMagick Advent::Hue ; 100 ]
Set Field [ GraphicsMagick Advent::brightness ; 100 ]
Set Field [ GraphicsMagick Advent::saturation ; 100 ]
Finally, we see that the field values for the three parameters are set back to the normal value of 100 so that you can reset them if necessary.
Here you can see again how the individual values behave at 50, 100 and 150.
Brightness: 
Saturation: 
Hue: 
Of course, a combination of the values is also possible. Here you can see the difference when all values are set to 50, 100 and 150.

I hope you enjoyed it and I will see you again tomorrow. I wish you a happy fourth advent Sunday.
